

Set up SSH for the SWC HPC cluster#
This guide explains how to connect to the SWC’s HPC cluster via SSH from any personal computer.
Warning
Some links within this document point to the SWC internal wiki, which is only accessible from within the SWC network. We recommend opening these links in a new tab.
Interpreting code blocks
Shell commands will be shown in code blocks like this
(with the $ sign indicating the shell prompt):
$ echo "Hello world!"
Similarly, Python code blocks will appear with the >>> sign indicating the
Python interpreter prompt:
>>> print("Hello world!")
The expected outputs of both Shell and Python commands will be shown without any prompt:
Hello world!
Abbreviations#
Prerequisites#
You have an SWC account and know your username and password.
You have read the SWC wiki’s section on High Performance Computing (HPC), especially the Logging into the Cluster page. This guide duplicates some of the information there, but also provides additional details and instructions.
You know the basics of using the command line, i.e. using the terminal to navigate the file system and run commands.
You have an SSH client installed on your computer. This is usually pre-installed on Linux and macOS. SSH is also available on Windows (since Windows 10), however some steps will differ. If you are a Windows user, read the note below before proceeding.
Note for Windows users
You have two options on how to proceed:
Install Git Bash, which emulates a Linux terminal on Windows and includes tools that are not available on Windows by default, such as
nanoandssh-copy-id. This is the recommended option, as it will allow you to follow along with all commands in this guide, as they are presented. Just assume that all commands are run in Git Bash.If you are using Windows 10 or newer, you can follow this guide (except for the section on SSH keys) using native Windows functionalities as described here.
To Log into the cluster, you can use the same commands as in the guide below, but typed in the Windows
cmdor PowerShell.The SSH config file section can be followed using the file browser and Notepad, instead of the terminal and
nano. Create the.sshfolder in your home directory, i.e.C:\Users\<USERNAME>\.ssh, if it does not already exist (don’t forget the.at the start of.ssh).You may create and edit the
configfile with Notepad but beware that the file must not have an extension. To create a file without an extension in Windows, you need to make the file extensions visible (click ‘View’ in the file browser and check the box ‘File name extensions’). Theconfigfile contents should be the same as in the guide below.In day-to-day use, you can use the
ssh swc-gatewaycommand natively in Windowscmd, provided that you have defined the alias in yourconfigfile, as this guide describes.
Log into the cluster#
Run the following commands on the terminal, replacing <SWC-USERNAME> with the username assigned to you by SWC’s IT.
Type the corresponding <SWC-PASSWORD> when prompted, but note that it will not be displayed on the screen as you type.
If you are physically at SWC on a wired network connection (i.e., not eduroam),
or connected via the SWC VPN, you can directly connect to the cluster’s gateway node (hpc-gw2).
$ ssh <SWC-USERNAME>@hpc-gw2.hpc.swc.ucl.ac.uk
<SWC-USERNAME>@hpc-gw2:~$
In any other scenario, you are not within the SWC network;
you must first connect to a secure access point—called the bastion
node (sgw2)—before you can proceed to the cluster’s gateway node (hpc-gw2).
$ ssh <SWC-USERNAME>@ssh.swc.ucl.ac.uk
<SWC-USERNAME>@sgw2:~$ ssh hpc-gw2
<SWC-USERNAME>@hpc-gw2:~$
SSH addresses vs hostnames
The address you SSH to isn’t always the hostname you land on. Notice above that
the bastion node’s address and hostname differ (ssh.swc.ucl.ac.uk vs sgw2).
To always know which node you’re on, check your terminal prompt
(<SWC-USERNAME>@<HOSTNAME>) or run hostname.
To return to the computer you came from, simply type exit.
You can think of exit as undoing the last ssh command you ran.
Further reading
If you want to learn more about the various types of HPC nodes (bastion / gateway / compute), read the next section.
If you want to make your life easier, you can set yourself up with an SSH config file and some SSH keys.
Types of HPC nodes#
A node is simply a computer that is part of the cluster. Let’s distinguish the different types of nodes on the SWC HPC system.
Node Type |
SSH Address |
Hostname |
Role |
|---|---|---|---|
Bastion |
|
|
Secure entry point: if you find yourself here, just type |
Gateway |
|
|
Staging area: use it only for filesystem navigation, editing scripts with a terminal-based editor (e.g. |
Compute |
assigned by SLURM via |
|
Workhorses that run the actual computations submitted via |
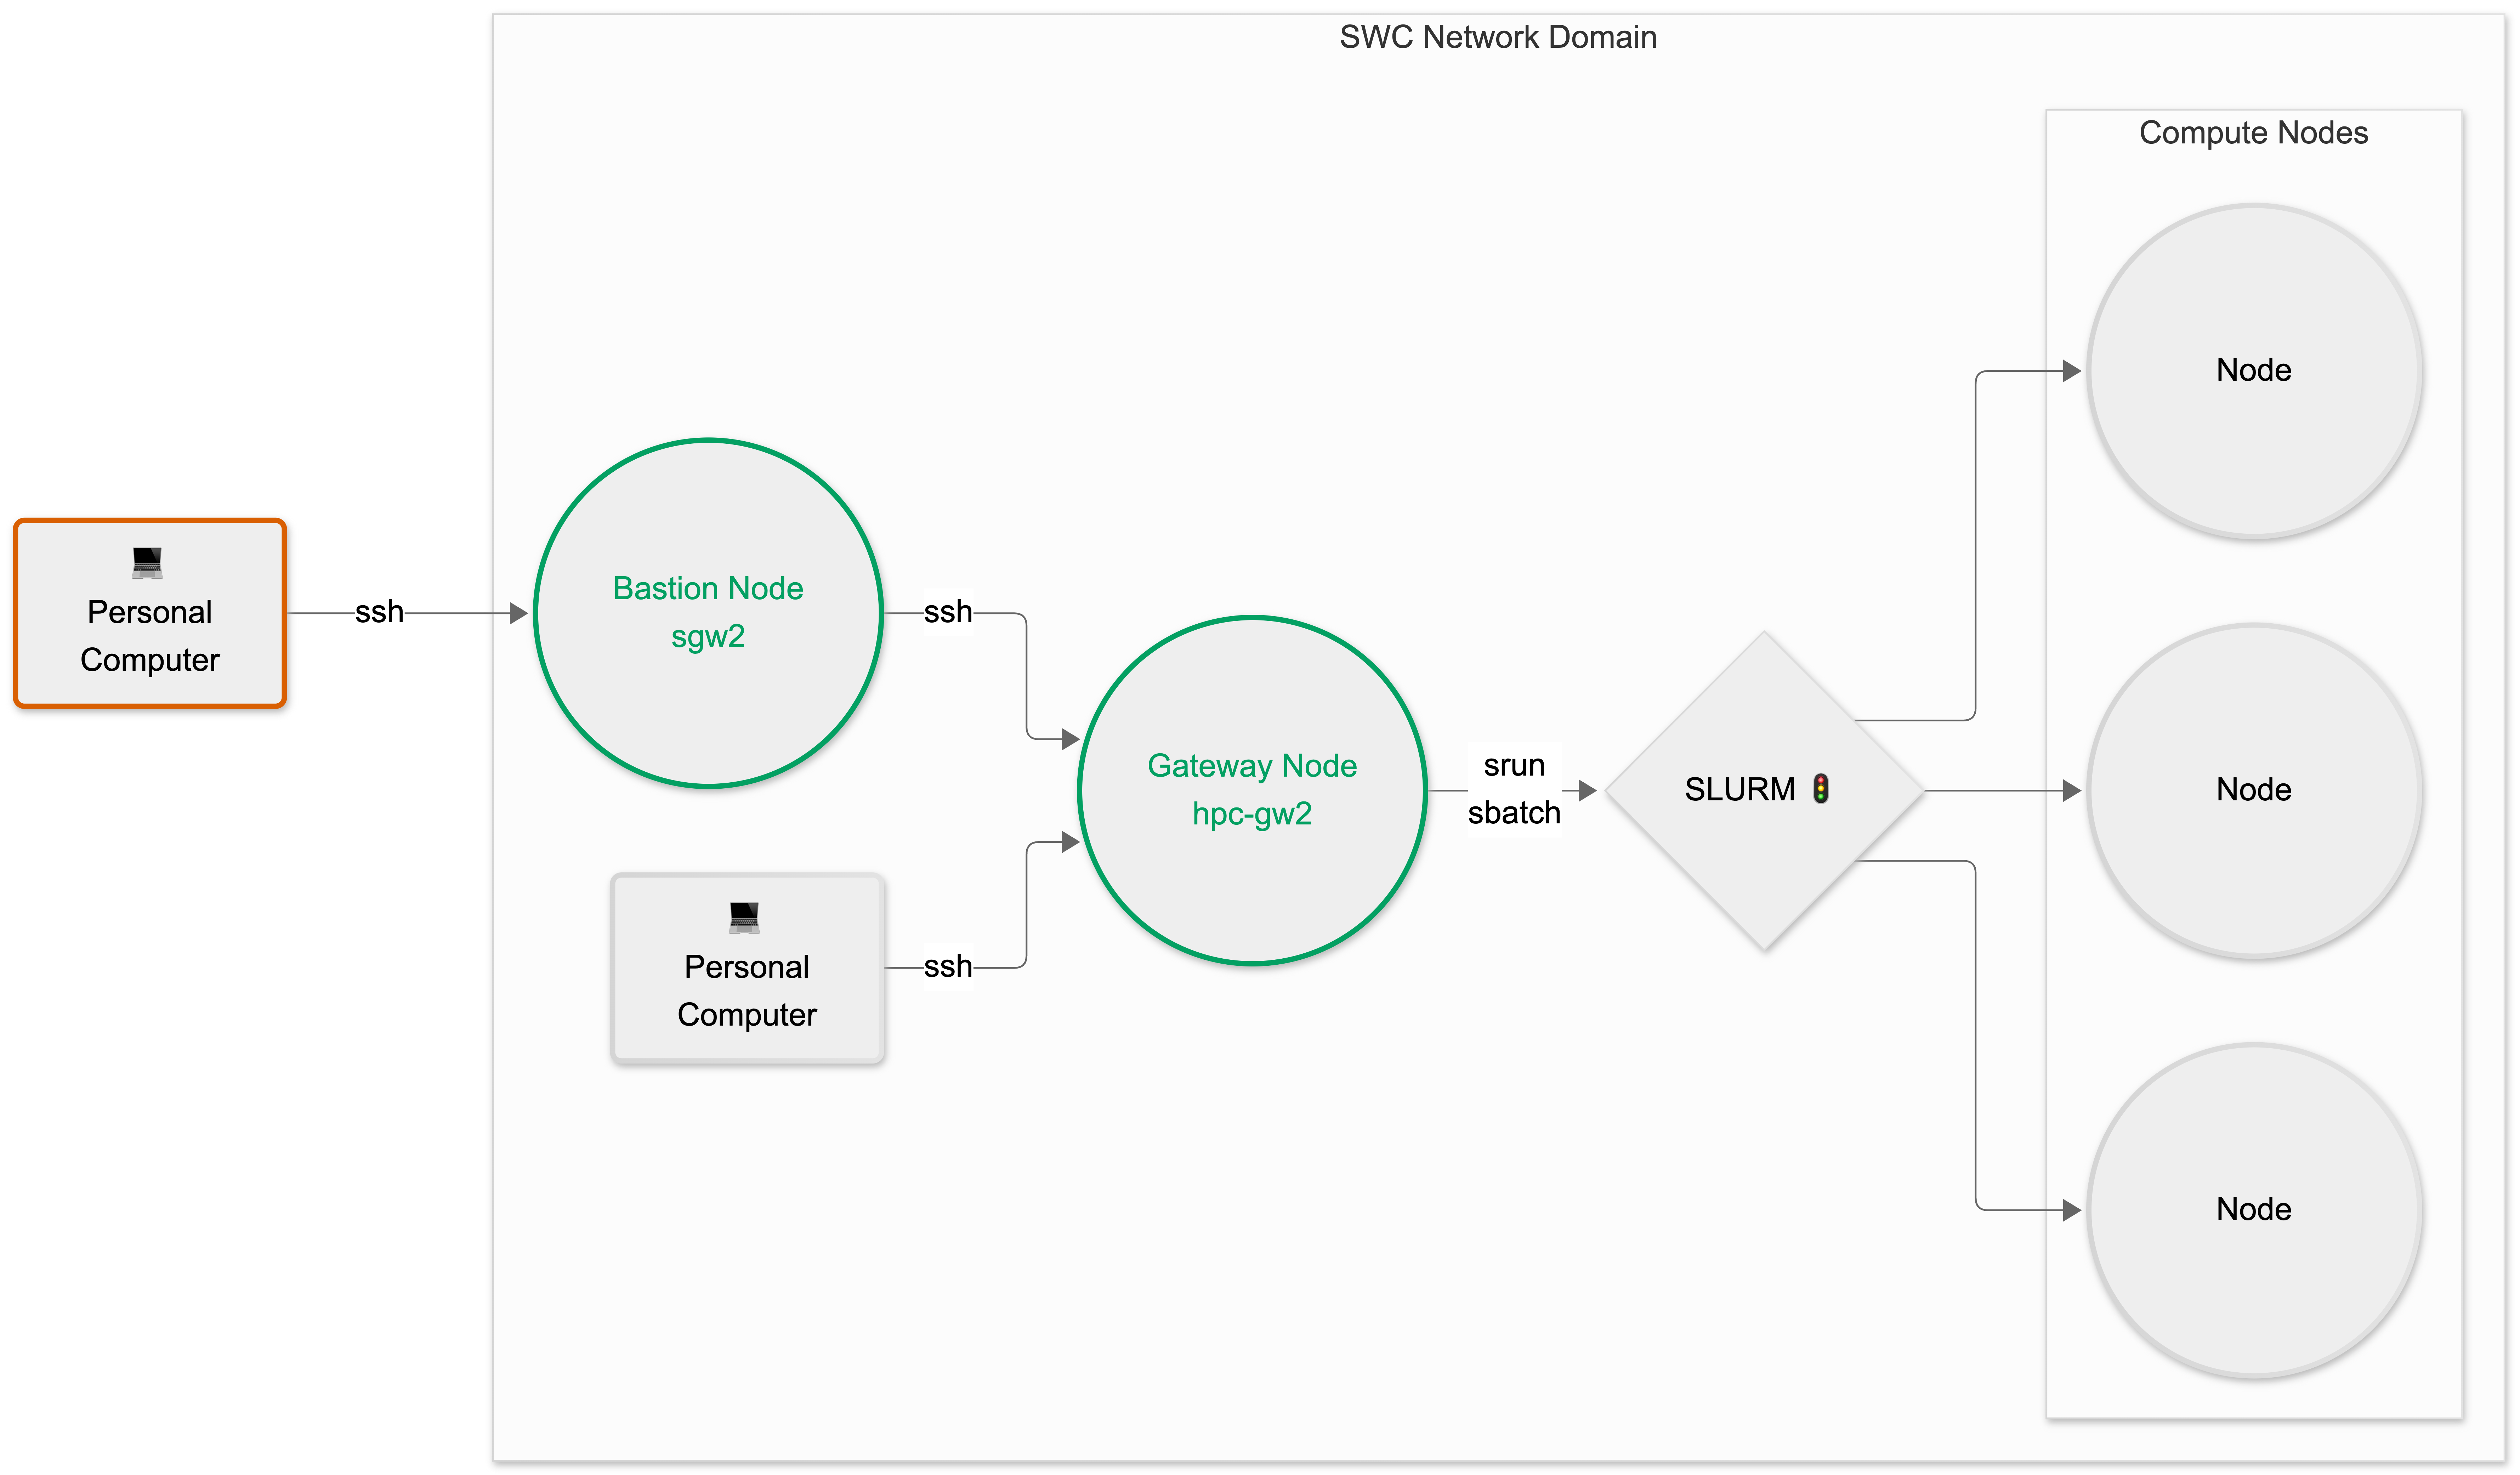
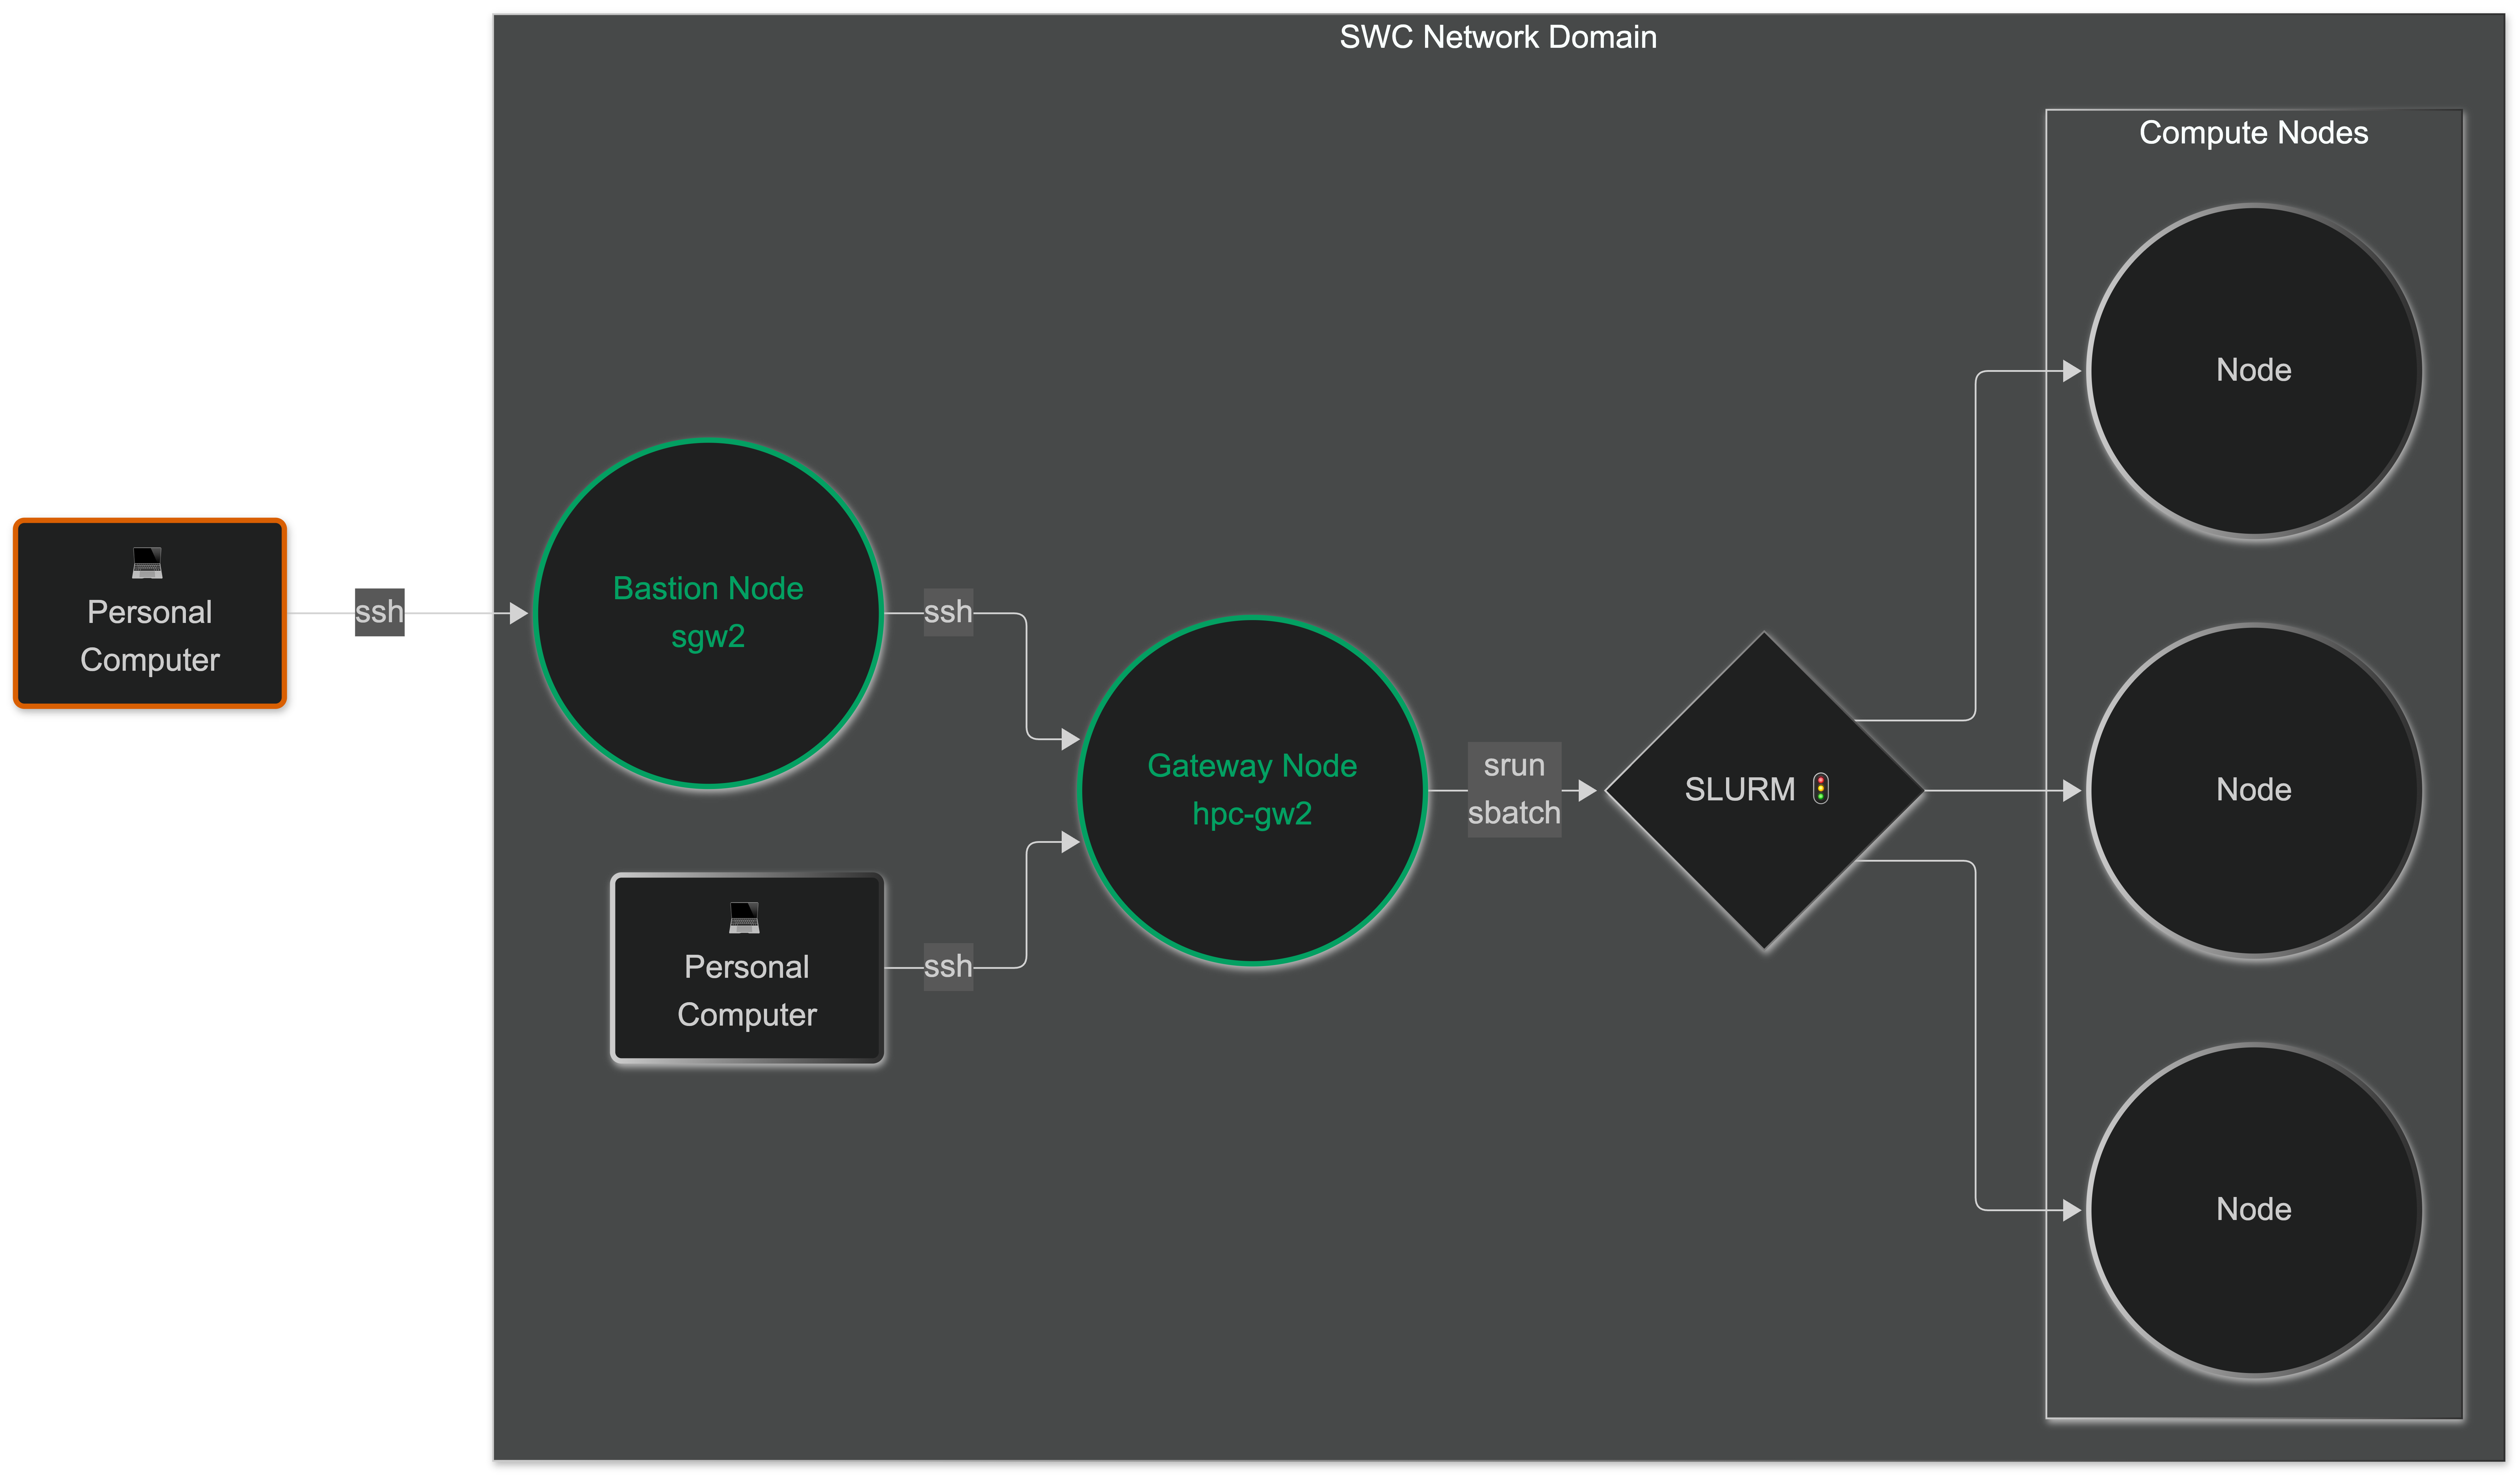
Your home directory, as well as the locations where filesystems like ceph are mounted, are shared across all of the nodes.
The compute nodes should only be accessed via the SLURM srun or sbatch commands from the gateway node.
Be mindful of using shared nodes
Avoid running any computations on the bastion or gateway nodes, as these are shared across all users of the HPC cluster. It’s always safer to request dedicated compute resources, which will be yours for the duration of your job.
For example, this is how you request an interactive session on a compute node to create a new conda environment:
$ srun -p cpu -n 4 --mem 8G --pty bash -i
$ module load miniconda
$ conda create -n myenv python=3.13
The first command requests 4 cores and 8GB of memory on a node of the cpu partition.
The --pty bash -i part specifies an interactive bash shell.
See the SLURM arguments primer for more information.
The following two commands are run in this shell, on the assigned compute node.
Type exit to leave the interactive session as soon as you’re finished.
Note on managed desktops#
The SWC’s IT team offers managed desktop computers equipped with either a Windows or a Linux image. These machines are already part of the SWC’s trusted network domain, meaning you can easily access the HPC cluster.
If you are using a managed Windows desktop, you can SSH directly into the gateway node from the Windows
cmdor PowerShell. You may use that node to prepare your scripts and submit SLURM jobs.If you are using a managed Linux desktop, you can even bypass the gateway node. In fact, you may directly submit SLURM jobs from your terminal, without having to SSH at all. That’s because managed Linux desktops use the same platform as the HPC nodes and are already equipped with the SLURM job scheduler.
SSH config file#
If you are frequently accessing the cluster, you may find yourself typing the same SSH commands over and over again. You can make your life easier by editing the SSH config file. This is a text file that lives in your home directory and contains a list of aliases for SSH connections.
Note
The config below is for connecting from outside the SWC network via the bastion node; if you are within the network, you don’t need it and can use the direct address shown in Log into the cluster.
On your local PC/Laptop, navigate to the .ssh folder in your user’s home ~ directory:
$ cd ~/.ssh
List the files in this directory:
$ ls -1
authorized_keys
config
known_hosts
Some of these files may not exist yet. Next we will open the config file
using the terminal text editor nano:
$ nano config
If the file doesn’t exist yet, it will be created. Add the following lines to the file:
# Specify our intermediate jump host, aka the bastion node
Host swc-bastion
    HostName ssh.swc.ucl.ac.uk
    User <SWC-USERNAME>

# Specify how to get to the gateway node by jumping through the bastion node
# The gateway hostname is specified as the jump-host would see it
Host swc-gateway
    HostName hpc-gw2
    User <SWC-USERNAME>
    ProxyJump swc-bastion
Save the file by pressing Ctrl+O, then Enter.
Exit the nano editor by pressing Ctrl+X.
From now on, you can directly SSH into the gateway node by typing:
$ ssh swc-gateway
You can also use the same syntax to SSH into the bastion node:
$ ssh swc-bastion
In both cases, typing the exit command once will return you to your local machine.
SSH keys#
If you are bored of typing your password every time you SSH into the cluster, you can set up authentication via SSH keys. You will have to do some work upfront, but it will save you tons of time in the long run. Plus, it’s more secure.
How does SSH key authentication work?
You generate a pair of keys locally—a public and a private one— and then copy the public key to the remote machine. When you try to SSH into the remote machine, the SSH client on your local machine will use the private key to generate a signature, which the SSH server on the remote machine will verify using the public key. If the signature is valid, you will be granted access.
There are several cryptographic algorithms that can be used to generate the keys.
They can be selected using the -t argument of the ssh-keygen command.
In the following example, we use ed25519, as it strikes a good balance between
security and speed for most use cases.
To generate a pair of SSH keys, run the following command on your local machine:
$ ssh-keygen -t ed25519
You will be prompted to enter a file path for the key. You may accept the
default (~/.ssh/id_ed25519) or choose another path/name.
Next, you will be prompted to enter a passphrase. This is an extra layer of security, but you can leave it blank if you want.
There are now two new files in the .ssh directory:
$ cd ~/.ssh
$ ls -1
authorized_keys
config
id_ed25519
id_ed25519.pub
known_hosts
The id_ed25519 file is your private key and it should never be shared with anyone.
The id_ed25519.pub file is your public key.
When to specify private key location in the SSH config
In most cases, you don’t need to explicitly specify the location of the private key
in your ~/.ssh/config file because SSH will automatically look for the default key names
(like id_rsa, id_ed25519, etc.) in the ~/.ssh directory.
However, if you’re using a non-default name or location for your private key,
or if you have multiple keys and want to specify which one to use for a particular host,
then you can add the IdentityFile directive in your ~/.ssh/config to
point to the private key.
For example, if you have a private key with a custom name <MY-SPECIAL-KEY>
in the ~/.ssh directory, you can add the following lines to your ~/.ssh/config file:
# Specify our intermediate jump host, aka the bastion node
Host swc-bastion
    HostName ssh.swc.ucl.ac.uk
    User <SWC-USERNAME>
    IdentityFile ~/.ssh/<MY-SPECIAL-KEY>

# Specify how to get to the gateway node by jumping through the bastion node
# The gateway hostname is specified as the jump-host would see it
Host swc-gateway
    HostName hpc-gw2
    User <SWC-USERNAME>
    ProxyJump swc-bastion
    IdentityFile ~/.ssh/<MY-SPECIAL-KEY>
Next, let’s copy the public key you just generated to the remote machine.
After that, you will be able to directly SSH into the gateway node
by typing ssh swc-gateway, without having to enter your password 🎉!
$ ssh-copy-id -i ~/.ssh/id_ed25519.pub swc-gateway
If you are within the SWC network and haven’t set up the aliases in your SSH config file, you can copy the key by specifying the SSH address of the gateway node:
$ ssh-copy-id -i ~/.ssh/id_ed25519.pub <SWC-USERNAME>@hpc-gw2.hpc.swc.ucl.ac.uk
Explain the above commands
The ssh-copy-id command copies the specified public key to your home directory
on the target machine and adds it to the .ssh/authorized_keys file there.
The target machine can be specified either by an alias defined in your SSH config file
(e.g. swc-gateway) or by its SSH address (e.g. hpc-gw2.hpc.swc.ucl.ac.uk).
Since your SWC home directory is shared across all HPC nodes, the public key will be available on all of them.